earph0n3's doc Help

zsh配置

配置zsh作为日常使用的终端shell

linux

linux下配置zsh比较简单, 基本上都能用包管理器和git进行安装

install zsh

直接使用命令行就能安装zsh

  • ubuntu:

    sudo apt install zsh
  • arch

    # 使用pacman sudo pacman -S zsh # 使用yay或者paru yay/paru -S zsh

配置zsh为当前用户默认shell

查看当前shell:

echo $SHELL # 一般结果都是/bin/bash

设置zsh为当前用户默认shell:

sudo chsh $USER # 输入zsh的位置, 一般使用/bin/zsh

安装oh-my-zsh

oh-my-zsh官网提供两种方式进行简单安装

# 通过curl sh -c "$(curl -fsSL https://raw.githubusercontent.com/ohmyzsh/ohmyzsh/master/tools/install.sh)" # 通过wget sh -c "$(wget https://raw.githubusercontent.com/ohmyzsh/ohmyzsh/master/tools/install.sh -O -)"

或者使用github镜像

# 使用curl sh -c "$(curl -fsSL https://gh-proxy.com/https://raw.githubusercontent.com/ohmyzsh/ohmyzsh/master/tools/install.sh)" # 使用wget sh -c "$(wget -O- https://gh-proxy.com/https://raw.githubusercontent.com/ohmyzsh/ohmyzsh/master/tools/install.sh)"

安装时会选择使用omz的.zshrc替换原有的, 同时原来的.zshrc会进行备份变成.zshrc.pre-oh-my-zsh

zsh plugins

个人一般只用zsh-syntax-highlightingzsh-autosuggestions, 其他的就不做考虑

使用git将插件clone到本地omz插件目录

git clone https://github.com/zsh-users/zsh-autosuggestions ${ZSH_CUSTOM:-~/.oh-my-zsh/custom}/plugins/zsh-autosuggestions git clone https://github.com/zsh-users/zsh-syntax-highlighting.git ${ZSH_CUSTOM:-~/.oh-my-zsh/custom}/plugins/zsh-syntax-highlighting

或者使用github镜像

git clone https://gh-proxy.com/https://github.com/zsh-users/zsh-autosuggestions ${ZSH_CUSTOM:-~/.oh-my-zsh/custom}/plugins/zsh-autosuggestions git clone https://gh-proxy.com/https://github.com/zsh-users/zsh-syntax-highlighting.git ${ZSH_CUSTOM:-~/.oh-my-zsh/custom}/plugins/zsh-syntax-highlighting

.zshrc中启用插件, 找到这一行

plugins=(git)

添加插件

plugins=(git zsh-autosuggestions zsh-syntax-highlighting)

重新source一下就行

source .zshrc

配置powerlevel10k

本来之前用的是omz不加主题, 搭配starship, 但是有点繁琐了, 所以就直接拿powerlevel10k来用了

同样使用git把主题clone到本地omz目录

git clone --depth=1 https://github.com/romkatv/powerlevel10k.git ${ZSH_CUSTOM:-$HOME/.oh-my-zsh/custom}/themes/powerlevel10k

或者使用github镜像

git clone --depth=1 https://gh-proxy.com/https://github.com/romkatv/powerlevel10k.git ${ZSH_CUSTOM:-$HOME/.oh-my-zsh/custom}/themes/powerlevel10k

完成之后修改.zshrc

ZSH_THEME="powerlevel10k/powerlevel10k"

重新source一下.zshrc就能看到p10k的引导界面, 根据引导进行设置即可

windows

window之前用的pwsh加starship, 也还行, 但是偶然想着能不能统一用zsh

配置过程比linux要繁琐一点

安装git

安装git没什么好说, 可以直接上官网下载

这里推荐找个国内镜像比如清华源, 在主页右边常用软件包安装程序中可以找到

唯一需要注意的是在安装时需要选择向window terminal添加git-bash的profile

安装完成后把git-bash设置成默认shell的过程不多赘述

安装zsh

git-bash为windows提供了一个bash环境, zsh需要额外安装

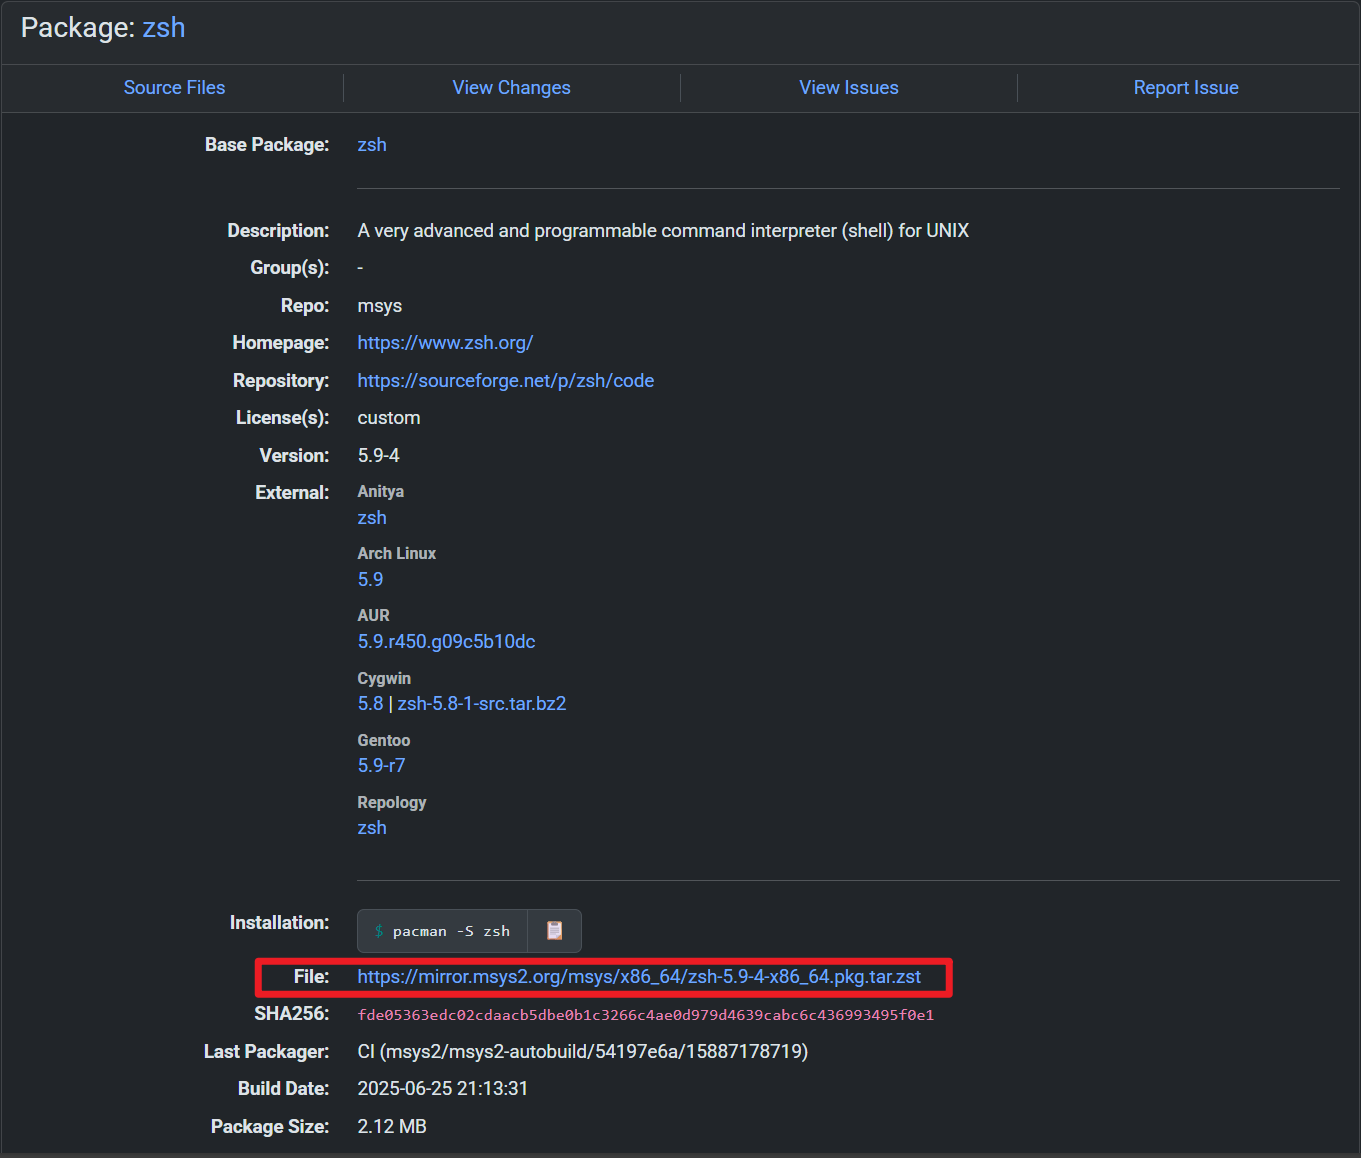
zsh可以直接在msys2找到包
image

下载名为zsh-$version$-x86_64.pkg.tar.zst的包, 版本截至文章编写时为5.9-4

两次解压后得到文件夹, 目录结构如下

|-- .BUILDINFO |-- .INSTALL |-- .MTREE |-- .PKGINFO |-- etc | `-- zsh `-- usr |-- bin |-- lib `-- share

将整个文件夹覆盖到git安装目录, 再次打开git-bash即可调用zsh

由于git-bash下没有chsh命令, 所以只能通过修改.zshrc来让每次启动时自动切换到zsh

.bashrc中加入如下内容(文件的末尾)

if [[ $- == *i* ]] && [ -t 1 ]; then exec zsh fi

install oh-my-zsh

omz在git-bash的环境下安装方式相同, 参照上面linux的安装方法即可

解决conda和mamba的hook问题

在windows上使用bash或zsh这类shell时, 不可避免会遇到换行符的问题

如果按照上面的内容安装完了zsh之后使用conda和mamba进行init, 会出现^M也就是回车导致zsh解析失败, powerlevel10k的instant prompt功能失效

问题定位

在使用conda和mamba进行zsh的init后, .zshrc中会添加两端hook, 启用conda和mamba的对应功能

每次打开zsh会报错

[WARNING]: Console output during zsh initialization detected. When using Powerlevel10k with instant prompt, console output during zsh initialization may indicate issues. You can: - Recommended: Change ~/.zshrc so that it does not perform console I/O after the instant prompt preamble. See the link below for details. * You will not see this error message again. * Zsh will start quickly and prompt will update smoothly. - Suppress this warning either by running p10k configure or by manually defining the following parameter: typeset -g POWERLEVEL9K_INSTANT_PROMPT=quiet * You will not see this error message again. * Zsh will start quickly but prompt will jump down after initialization. - Disable instant prompt either by running p10k configure or by manually defining the following parameter: typeset -g POWERLEVEL9K_INSTANT_PROMPT=off * You will not see this error message again. * Zsh will start slowly. - Do nothing. * You will see this error message every time you start zsh. * Zsh will start quickly but prompt will jump down after initialization. For details, see: https://github.com/romkatv/powerlevel10k#instant-prompt -- console output produced during zsh initialization follows --

omz检测到了在zsh初始化时的输出, 在报错信息后紧接着两行

(eval):7: parse error near `^M' (eval):15: parse error near `^M'

也就是脚本中包含了windows的回车, conda和mamba的init过程失败, 导致zsh无法解析从而产生输出, 影响了powerlevel10k的instant prompt功能

回看.zshrc, 其中确实包含了两行eval

# conda eval "$('/d/miniforge3/Scripts/conda.exe' 'shell.zsh' 'hook')" # mamba eval "$("$MAMBA_EXE" shell hook --shell zsh --root-prefix "$MAMBA_ROOT_PREFIX")"

具体内容时conda和mamba各自调用了自己的hook, 生成了自己的临时hook脚本, 交由eval来执行

但由于conda和mamba属于windows程序, 生成hook脚本过程中添加的换行符全部都为windows换行

eval在执行hook脚本时无法解析其中的回车符(^M)从而发生了错误

上面的内容可以通过下面的方法来验证

# 手动执行命令生成hook脚本 '/d/miniforge3/Scripts/conda.exe' 'shell.zsh' 'hook' > conda_hook.txt # 使用cat显示所有特殊字符 cat -A conda_hook.txt

回显中会包含大量^M

临时解决方案是在对应的命令结尾加上管道符将生成的hook脚本交由dos2unix来处理

使用dos2unix替换原来的windows换行为unix换行, 再交由eval来执行

# conda eval "$('/d/miniforge3/Scripts/conda.exe' 'shell.zsh' 'hook' | dos2unix)" # mamba eval "$("$MAMBA_EXE" shell hook --shell zsh --root-prefix "$MAMBA_ROOT_PREFIX" | dos2unix)"

但是, 替换后仍然发生报错

(eval):unset:1: _CE_M^M: invalid parameter name

发现竟然还有^M?

于是对生成的hook脚本进行检查, 发现在conda的hook脚本中包含一个eval

__conda_activate() { if [ -n "${CONDA_PS1_BACKUP:+x}" ]; then # Handle transition from shell activated with conda <= 4.3 to a subsequent activation # after conda updated to >= 4.4. See issue #6173. PS1="$CONDA_PS1_BACKUP" \unset CONDA_PS1_BACKUP fi \local ask_conda # 这里生成命令 ask_conda="$(PS1="${PS1:-}" __conda_exe shell.posix "$@")" || \return # 这里eval执行 \eval "$ask_conda" __conda_hashr }

也就是说在hook脚本中又生成了一条临时命令交由eval来执行, 毫无疑问这里生成的内容包含^M

于是对conda的hook命令再做修改, 使用正则将hook脚本中对应的内容进行修改, 也就是加上dos2unix

eval "$('/d/miniforge3/Scripts/conda.exe' 'shell.zsh' 'hook' \ | sed 's#__conda_exe shell\.posix "\$@"#__conda_exe shell.posix "$@" | dos2unix#' \ | dos2unix)"

原以为万事大吉, 结果依旧报错, 这回是python

Traceback (most recent call last): File "D:\miniforge3\Lib\site-packages\conda\exception_handler.py", line 28, in __call__ return func(*args, **kwargs) ^^^^^^^^^^^^^^^^^^^^^ File "D:\miniforge3\Lib\site-packages\conda\cli\main.py", line 87, in main_sourced print(activator.execute(), end="") UnicodeEncodeError: 'gbk' codec can't encode character '\uf253' in position 937: illegal multibyte sequence

python在执行hook时无法解析'uf253\'(默认使用gbk)

所以这里直接在.zshrc环境变量添加一条

export PYTHONIOENCODING=utf-8

问题解决

最终方案

将conda和mamba的hook命令进行替换

# conda eval "$('/d/miniforge3/Scripts/conda.exe' 'shell.zsh' 'hook')" # conda(patch) eval "$('/d/miniforge3/Scripts/conda.exe' 'shell.zsh' 'hook' \ | sed 's#__conda_exe shell\.posix "\$@"#__conda_exe shell.posix "$@" | dos2unix#' \ | dos2unix)" # mamba eval "$("$MAMBA_EXE" shell hook --shell zsh --root-prefix "$MAMBA_ROOT_PREFIX")" # mamba(patch) eval "$("$MAMBA_EXE" shell hook --shell zsh --root-prefix "$MAMBA_ROOT_PREFIX" | dos2unix)"

并添加一条环境变量(在.zshrc的对应位置, conda和mamba的hook执行之前)

export PYTHONIOENCODING=utf-8
29 九月 2025